뇽안 하세요!
이번주는 제품관리 페이지를 제작해봤읍니다.
사실 예전에 해봤던 것이라 수월하게 끝내버렸읍니다. 조금의 annotation이 기억이 안났지만..ㅎ
다시 기억을 꺼내꺼내 했습니다..ㅎㅎ
우선 필요한 HTML파일을 만들어 봤씁니돠!

일단 구조는 이런뎁쇼.. WEB-INF로 만들어야 하지만..귀ㅊ..
어쨌든 일단 맹글고 맹글어 봤습니다!
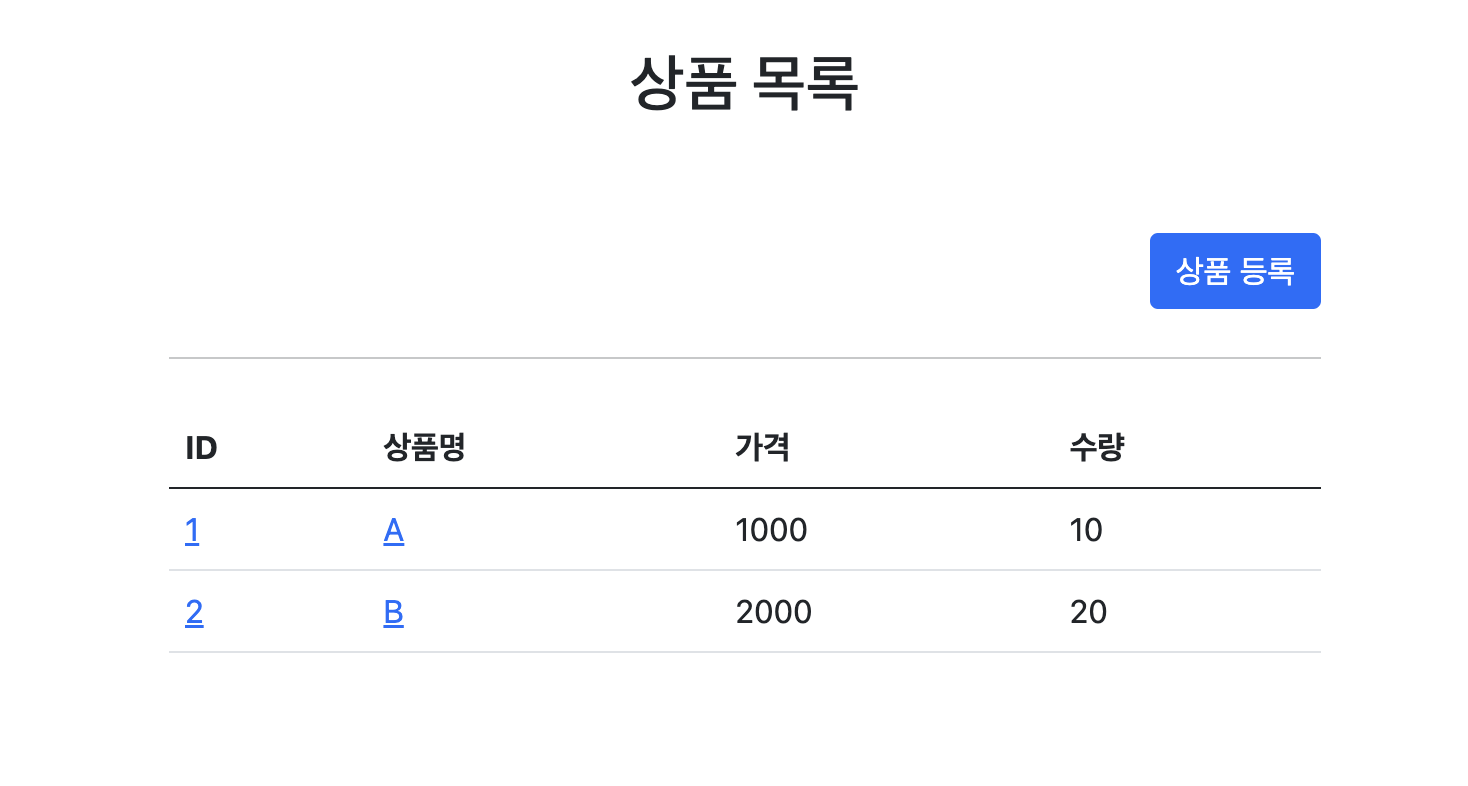
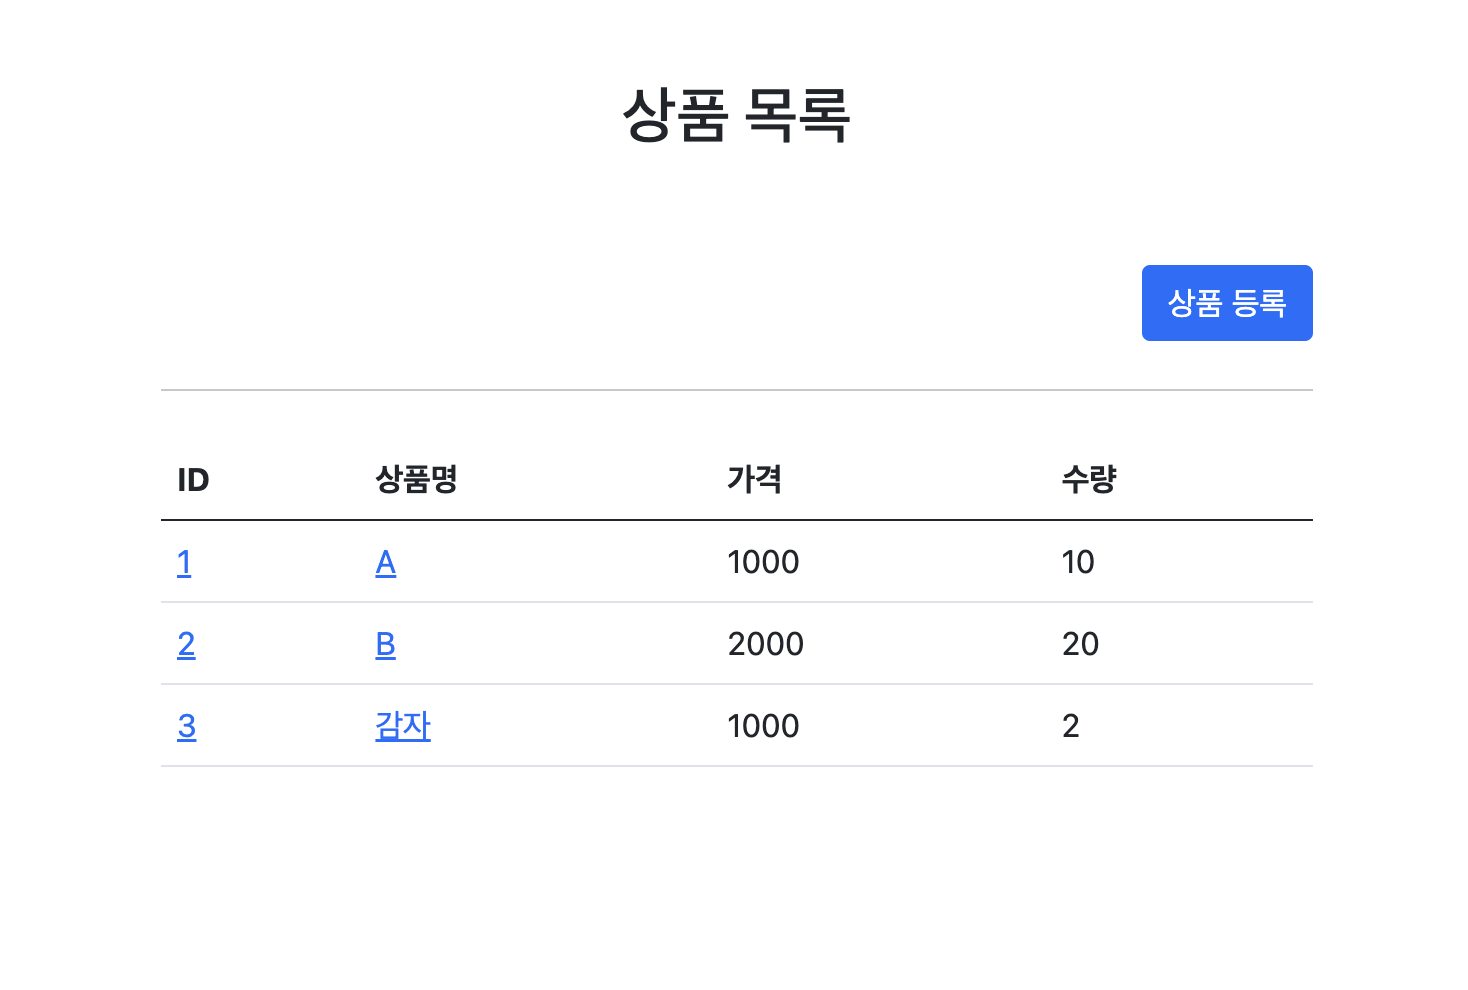
일단 메인으로 보일 상품목록 페이지를 맹글몽글
<!DOCTYPE html>
<html lang="en" xmlns:th="http://www.thymeleaf.org">
<head>
    <meta charset="UTF-8">
    <title>Title</title>
  <link th:href="@{/css/bootstrap.min.css}"
            href="/css/bootstrap.min.css" rel="stylesheet">
</head>
<body>
<div class="container" style="max-width: 600px">
    <div class="py-5 text-center">
        <h2>상품 목록</h2>
    </div>

    <div class="row">
        <div class="col">
            <button class="btn btn-primary float-end"
                onclick="location.href='addForm.html'"
                    th:onclick="|location.href='@{/basic/items/add}'|" type="button">상품 등록</button>
        </div>
    </div>

    <hr class="my-4">
    <div>
        <table class="table">
            <thead>
            <tr>
                <th>ID</th>
                <th>상품명</th>
                <th>가격</th>
                <th>수량</th>
            </tr>
            </thead>
            <tr th:each="item:${items}">
                <td><a href="items.html" th:href="@{/basic/items/{itemId}(itemId = ${item.id})}" th:text="${item.id}">회원아이디</a></td>
                <td><a th:href="@{|/basic/items/${item.id}|}" th:text="${item.itemName}">상품명</a></td>
                <td th:text="${item.price}">10000</td>
                <td th:text="${item.quantity}">10</td>
            </tr>
        </table>
    </div>
</div>
</body>
</html>
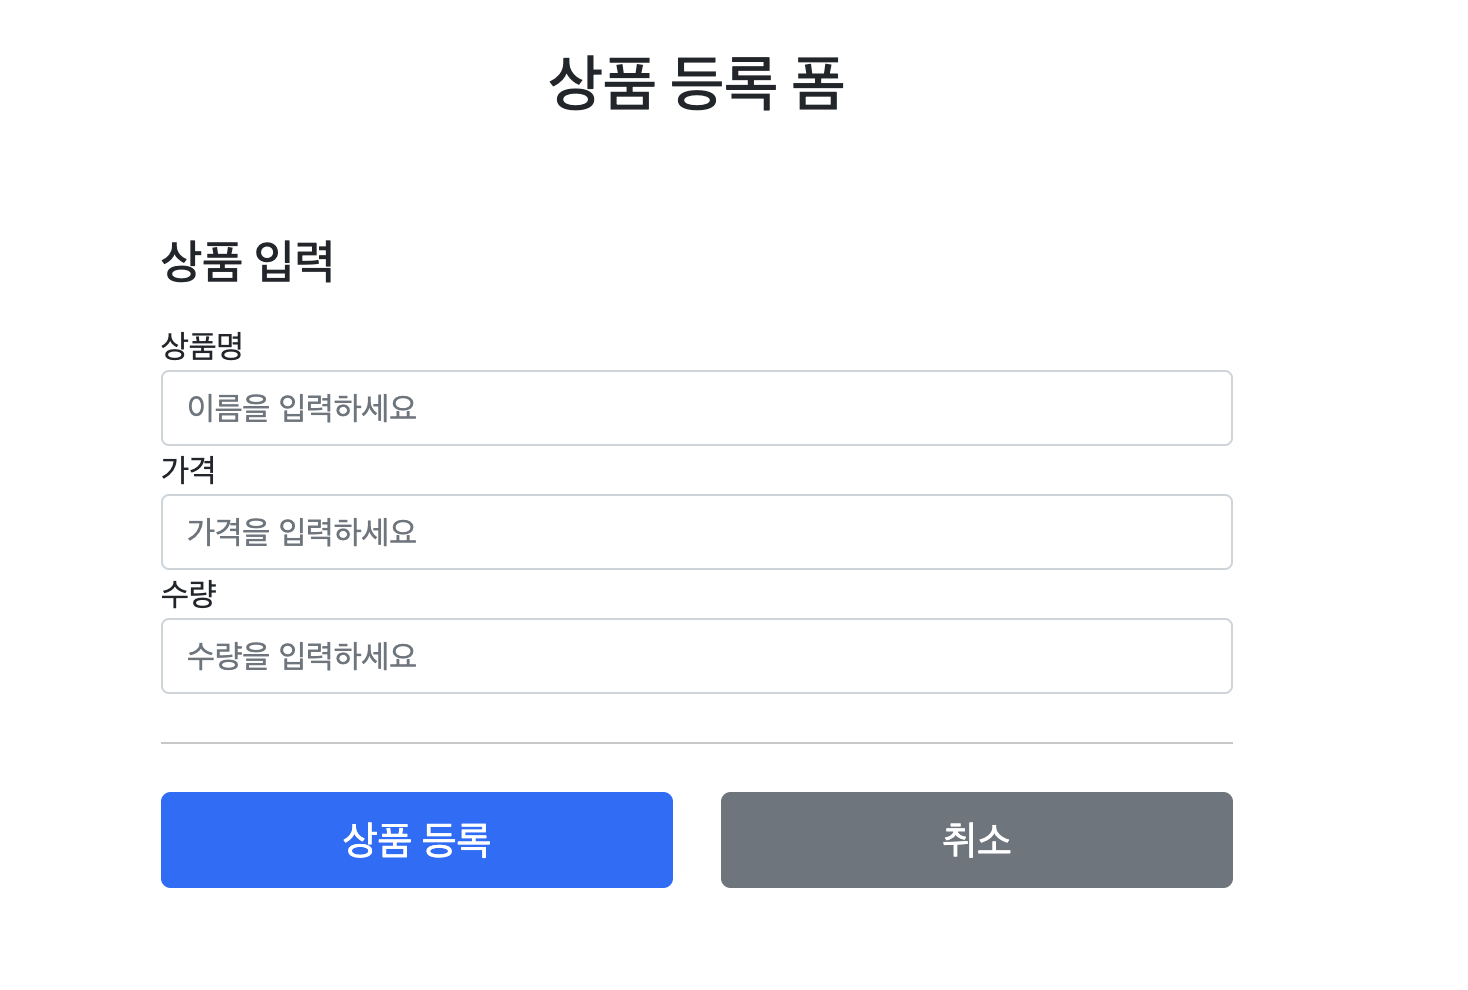
그 다음은 상품을 등록할 페이지를 만들었숩다니
<!DOCTYPE HTML>
<html>
<head>
    <meta charset="utf-8">
    <link href="/css/bootstrap.min.css" rel="stylesheet">
    <style>
        .container {
            max-width: 560px;
        }
    </style>
</head>
<body>
<div class="container">
    <div class="py-5 text-center">
        <h2>상품 등록 폼</h2>
    </div>
    <h4 class="mb-3">상품 입력</h4>

    <form action="item.html" th:action method="post">
        <div>
            <label for="itemName">상품명</label>
            <input type="text" id="itemName" name="itemName" class="form-control" placeholder="이름을 입력하세요">
        </div>
        <div>
            <label for="price">가격</label>
            <input type="text" id="price" name="price" class="form-control" placeholder="가격을 입력하세요">
        </div>
        <div>
            <label for="quantity">수량</label>
            <input type="text" id="quantity" name="quantity" class="form-control" placeholder="수량을 입력하세요">
        </div>
        <hr class="my-4">
        <div class="row">
            <div class="col">
                <button class="w-100 btn btn-primary btn-lg" type="submit">상품 등록</button>
            </div>
            <div class="col">
                <button class="w-100 btn btn-secondary btn-lg" onclick="location.href='items.html'" th:onclick="|location.href='@{/basic/items}'|" type="button">취소</button>
            </div>
        </div>
    </form>
</div> <!-- /container -->
</body>
</html>
그리고 상품을 등록했으면 수정도 해야하지 않것읍니꽈?
바로 그냥 수정 페이지 만들기
<!DOCTYPE HTML>
<html>
<head>
  <meta charset="utf-8">
  <link href="/css/bootstrap.min.css" rel="stylesheet">
  <style>
    .container {
      max-width: 560px;
    } </style>
</head>
<body>
<div class="container">
  <div class="py-5 text-center">
    <h2>상품 수정 폼</h2>
  </div>
  <form action="item.html" th:action method="post">
    <div>
      <label for="id">상품 ID</label>
      <input type="text" id="id" name="id" class="form-control" value="1"
             th:value="${item.id}"
             readonly>
    </div>
    <div>
      <label for="itemName">상품명</label>
      <input type="text" id="itemName" name="itemName" class="form-control"
             th:value="${item.itemName}"
             value="상품A">
    </div>
    <div>
      <label for="price">가격</label>
      <input type="text" id="price" name="price" class="form-control"
             th:value="${item.price}"
             value="10000">
    </div>
    <div>
      <label for="quantity">수량</label>
      <input type="text" id="quantity" name="quantity" class="form-control"
             th:value="${item.quantity}"
             value="10">
    </div>
    <hr class="my-4">
    <div class="row">
      <div class="col">
        <button class="w-100 btn btn-primary btn-lg" type="submit">저장
        </button>
      </div>
      <div class="col">
        <button class="w-100 btn btn-secondary btn-lg" onclick="location.href='item.html'"
                th:onclick="|location.href='@{/basic/items/{itemId}(itemId=${item.id})}'|"
                type="button">취소</button>
      </div>
    </div>
  </form>
</div> <!-- /container -->
</body>
</html>
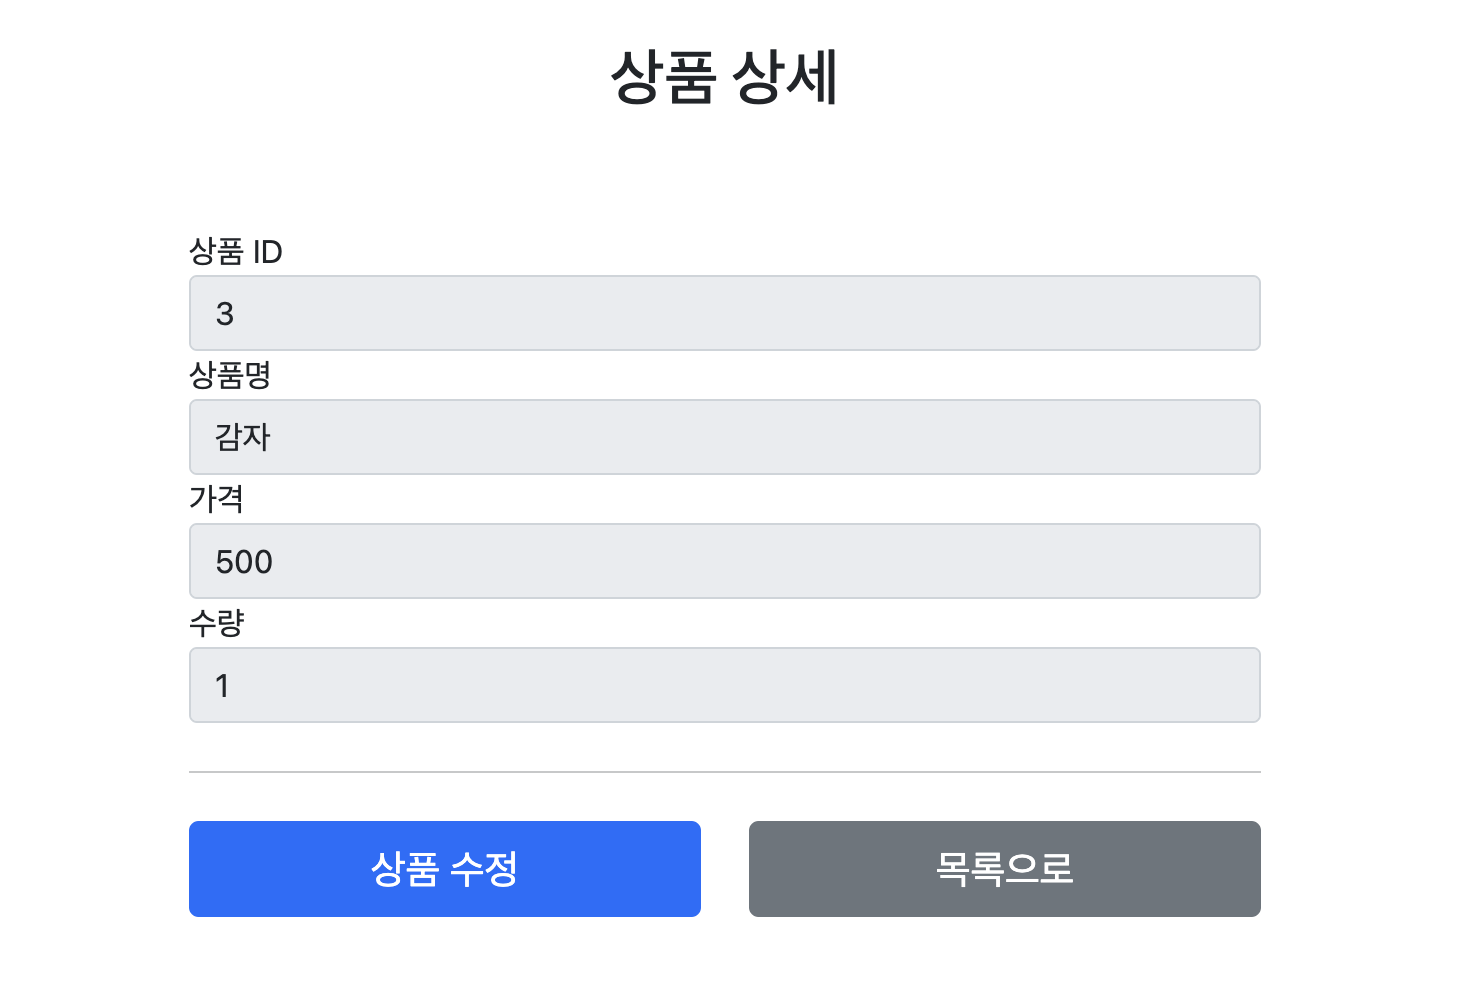
그 다음은 등록한 상품의 상세 페이지를 보여줘야 할 것이기 문때문때문에 상품 상세 페이지도 만들어 줍니다
<!DOCTYPE HTML>
<html>
<head>
  <meta charset="utf-8">
  <link th:href="@{/css/bootstrap.min.css}"
          href="/css/bootstrap.min.css" rel="stylesheet">
  <style>
    .container {
      max-width: 560px;
    }
  </style>
</head>
<body>
<div class="container">
  <div class="py-5 text-center">
    <h2>상품 상세</h2> </div>
  <div>
    <label for="itemId">상품 ID</label>
    <input type="text" id="itemId" name="itemId" class="form-control"
           th:value="${item.id}"
           value="1" readonly>
  </div>
  <div>
    <label for="itemName">상품명</label>
    <input type="text" id="itemName" name="itemName" class="form-control"
          th:value="${item.itemName}"
           value="상품A" readonly> </div>
  <div>
    <label for="price">가격</label>
    <input type="text" id="price" name="price" class="form-control"
           th:value="${item.price}"
           value="10000" readonly>
  </div>
  <div>
    <label for="quantity">수량</label>
    <input type="text" id="quantity" name="quantity" class="form-control"
         th:value="${item.quantity}"
           value="10" readonly>
  </div>
  <hr class="my-4">
  <div class="row">
    <div class="col">
      <button class="w-100 btn btn-primary btn-lg"
              onclick="location.href='editForm.html'" th:onclick="|location.href='@{/basic/items/{itemId}/edit(itemId=${item.id})}'|" type="button">상품 수정</button> </div>
    <div class="col">
      <button class="w-100 btn btn-secondary btn-lg"
              onclick="location.href='items.html'" type="button" th:onclick="|location.href='@{/basic/items}'|">목록으로</button> </div>
  </div>
</div>
<!-- /container -->
</body>
</html>
그럼 이제 프런트 부분은 만들었으니 제대로 연결 해보자요!
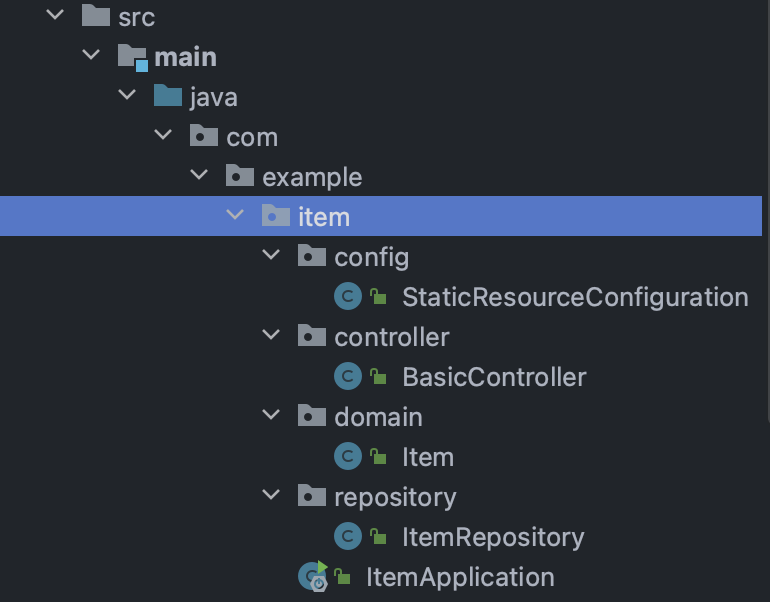
구조는 이렇게 잡았습니다!
먼저 domain부터 처리를 슥슥해보겠습니다.
package com.example.item.domain;

import lombok.Data;

@Data @Getter @Setter
public class Item {
    private Long id;
    private String itemName;
    private Integer price;
    private Integer quantity;

    public Item(){
    }

    public Item(String itemName, Integer price, Integer quantity) {
        this.itemName = itemName;
        this.price = price;
        this.quantity = quantity;
    }
}
componentScanner가 알잘딱깔센 해줄거기 때문에 annotation으로 처리!
그리고 이제 상품을 저장해줄 Repository를 생성합니다.
원래는 interFace로 만들고나서 사용하는 확장성을 줘야하지만 간단한 과제이기 때문에 확장성은 생략합니다.
package com.example.item.repository;

import com.example.item.domain.Item;
import org.springframework.stereotype.Repository;

import java.util.ArrayList;
import java.util.HashMap;
import java.util.List;
import java.util.Map;

@Repository
public class ItemRepository {
    public ItemRepository() {
    }

    private static final Map<Long, Item> store = new HashMap<>();
    private static long sequance = 0L;

    public Item save(Item item){
        item.setId(++sequance);
        store.put(item.getId(),item);
        return item;
    }

    public Item findById(Long id){return store.get(id);}

    public List<Item> findAll(){
        return new ArrayList<>(store.values());
    }

    public void update(long itemId, Item updateParam){
        Item findItem = findById(itemId);
        findItem.setItemName(updateParam.getItemName());
        findItem.setPrice(updateParam.getPrice());
        findItem.setQuantity(updateParam.getQuantity());
    }

    public void clearStore(){
        store.clear();
    }
}
Repository의 메서드는 저장, 아이디로 찾기, 모두 찾기, 업데이트로 구현했습니다.
메서드의 구현이 제대로 되었는지 확인하기 위해서 Test Code를 작성했습니다.
package com.example.item.repository;

import com.example.item.domain.Item;
import org.junit.jupiter.api.AfterEach;
import org.junit.jupiter.api.Test;
import java.util.List;
import static org.assertj.core.api.Assertions.assertThat;


class ItemRepositoryTest {

    ItemRepository store = new ItemRepository();

    @AfterEach
    public void clean(){
        store.clearStore();
    }

    @Test
    public void save(){
        //given
        Item item = new Item("A",100,10);
        //when
        Item savedItem = store.save(item);

        //then
        assertThat(item).isEqualTo(store.findById(savedItem.getId()));
    }

    @Test
    public void findAll(){
        //given
        Item item1 = new Item("A",1000,10);
        Item item2 = new Item("B",2000,20);

        store.save(item1);
        store.save(item2);
        //when
        List<Item> result = store.findAll();
        //then
        assertThat(result.size()).isEqualTo(2);
        assertThat(result).contains(item1,item2);
    }

    @Test
    public void updateItem(){
        //given
        Item item = new Item("A",1000,10);
        Item savedItem = store.save(item);
        //when
        Item updateParam = new Item("B",2000,20);
        store.update(savedItem.getId(),updateParam);
        Item findItem = store.findById(savedItem.getId());
        //then
        assertThat(findItem.getItemName()).isEqualTo(updateParam.getItemName());
        assertThat(findItem.getPrice()).isEqualTo(updateParam.getPrice());
        assertThat(findItem.getQuantity()).isEqualTo(updateParam.getQuantity());
    }
}
제대로 작동하는걸 확인했고, 이제는 컨트롤러로 페이지들을 연결하고 관리보해겠니읍다
package com.example.item.controller;

import com.example.item.domain.Item;
import com.example.item.repository.ItemRepository;
import org.springframework.beans.factory.annotation.Autowired;
import org.springframework.stereotype.Controller;
import org.springframework.ui.Model;
import org.springframework.web.bind.annotation.*;
import org.springframework.web.servlet.mvc.support.RedirectAttributes;

import javax.annotation.PostConstruct;
import java.util.List;

@Controller
@RequestMapping("/basic/items")
public class BasicController {
    private final ItemRepository itemRepository;

    @Autowired
    public BasicController(ItemRepository itemRepository) {
        this.itemRepository = itemRepository;
    }

    @GetMapping
    public String items(Model model){
        List<Item> items = itemRepository.findAll();
        model.addAttribute("items",items);
        return "basic/items";
    }

    @GetMapping("/{itemId}")
    public String item(@PathVariable long itemId, Model model){
        Item item = itemRepository.findById(itemId);
        model.addAttribute("item",item);
        return "basic/item";
    }

    @GetMapping("/add")
    public String add(){
        return "basic/addForm";
    }

    @PostMapping("/add")
    public String addItem(Item item, RedirectAttributes redirectAttributes){
        Item save = itemRepository.save(item);
        redirectAttributes.addAttribute("itemId",save.getId());
        redirectAttributes.addAttribute("status",true);
        return "redirect:/basic/items/{itemId}";
    }

    @GetMapping("/{itemId}/edit")
    public String editForm(@PathVariable Long itemId, Model model){
        Item item = itemRepository.findById(itemId);
        model.addAttribute("item",item);
        return "basic/editForm";
    }

    @PostMapping("/{itemId}/edit")
    public String edit(@PathVariable Long itemId, @ModelAttribute Item item){
        itemRepository.update(itemId,item);
        return "redirect:/basic/items/{itemId}";
    }
    @PostConstruct
    public void init(){
        itemRepository.save(new Item("A",1000,10));
        itemRepository.save(new Item("B",2000, 20));
    }
}
상품 목록에 아무것도 없으면 그래서 기본으로 깔아놓은 Item 2개를 슥슥 만들었니숩다!
추가로 redirectAttributes를 사용해서 제품의 아이디에 따라 상품의 정보를 다르게 보여주는 url 편집을 해준다답
이렇게 하면 아래와 같이 짜란짜란 하고 나타난답


'LikeLion🦁' 카테고리의 다른 글
| 떠나요~ 대천으로🏖️ (3) | 2023.08.01 |
|---|---|
| 뛰슈 - 기능명세서 작성하기 (1) | 2023.07.28 |
| 감자의 MT 참여하기 (3) | 2023.05.16 |
| 우리 아이가 사고쳤어요~ (0) | 2023.05.09 |
| 사자가 된 감자 4주차 (1) | 2023.05.07 |
